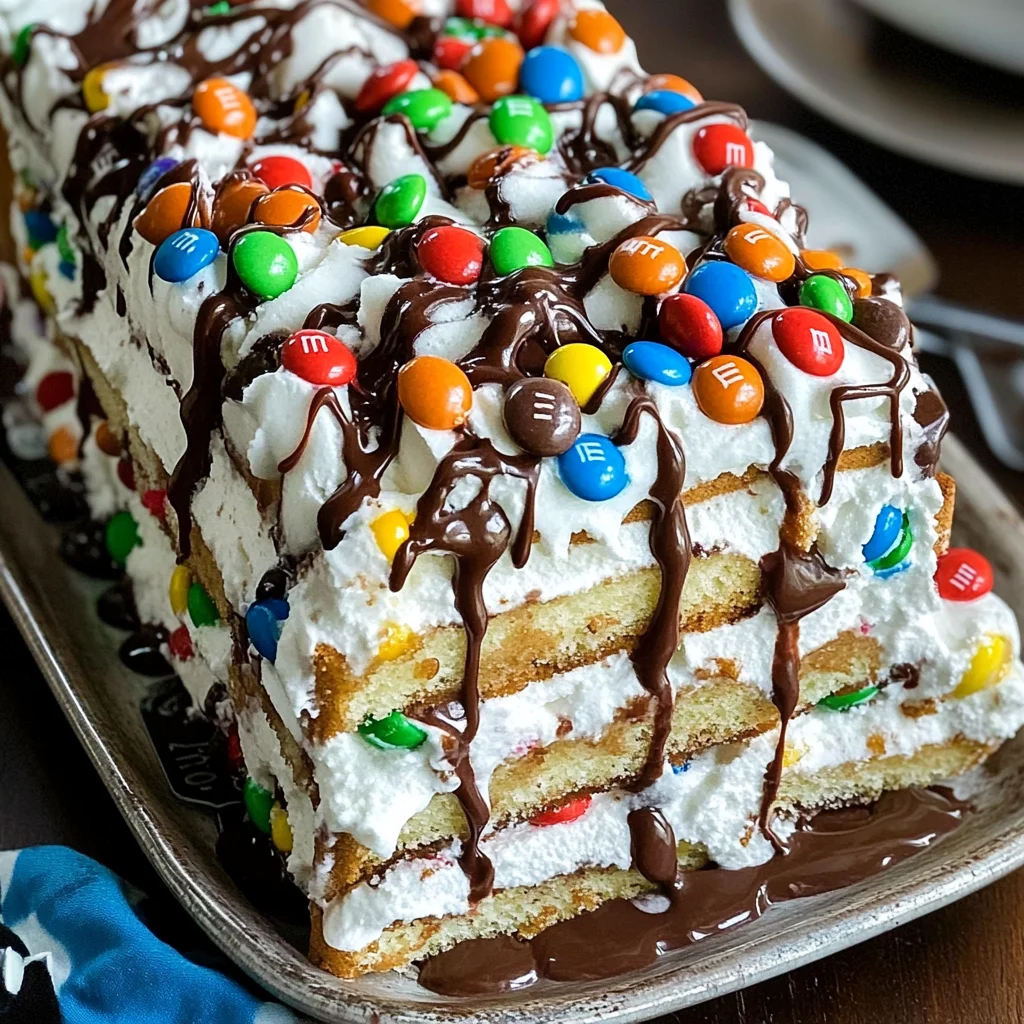
Ice Cream Sandwich Cake
This Ice Cream Sandwich Cake is a delightful treat that combines layers of ice cream sandwiches, fluffy whipped topping, and colorful candy. It’s an easy yet visually stunning dessert, making it perfect for summer gatherings, birthday parties, and school events. With its creamy texture and fun toppings, this cake will impress guests of all ages!
Why You’ll Love This Recipe
- Effortless Preparation: This recipe requires minimal effort; just layer and freeze for a delicious result.
- Fun for Everyone: Perfect for kids and adults alike, it satisfies sweet cravings in a fun way.
- Customizable Toppings: Feel free to swap candies or add your favorite toppings to make it your own.
- No Baking Required: Enjoy a delicious dessert without the need for an oven, keeping your kitchen cool.
- Perfect for Any Occasion: Whether it’s a birthday party or just a hot summer day, this cake fits right in.
Tools and Preparation
To create your ice cream sandwich cake, you’ll need some essential tools. Having the right equipment makes the process smoother and more enjoyable.
Essential Tools and Equipment
- Serving plate
- Piping bag with a large star tip
- Freezer-safe container
Importance of Each Tool
- Serving plate: A sturdy plate provides a great base for building your layers while also showcasing your beautiful dessert.
- Piping bag with a large star tip: This tool allows for easy decorating with whipped topping, creating an eye-catching design.
- Freezer-safe container: Ensures that your cake freezes evenly and retains its shape until ready to serve.
Ingredients
Here are the ingredients you’ll need to make the delicious Ice Cream Sandwich Cake:
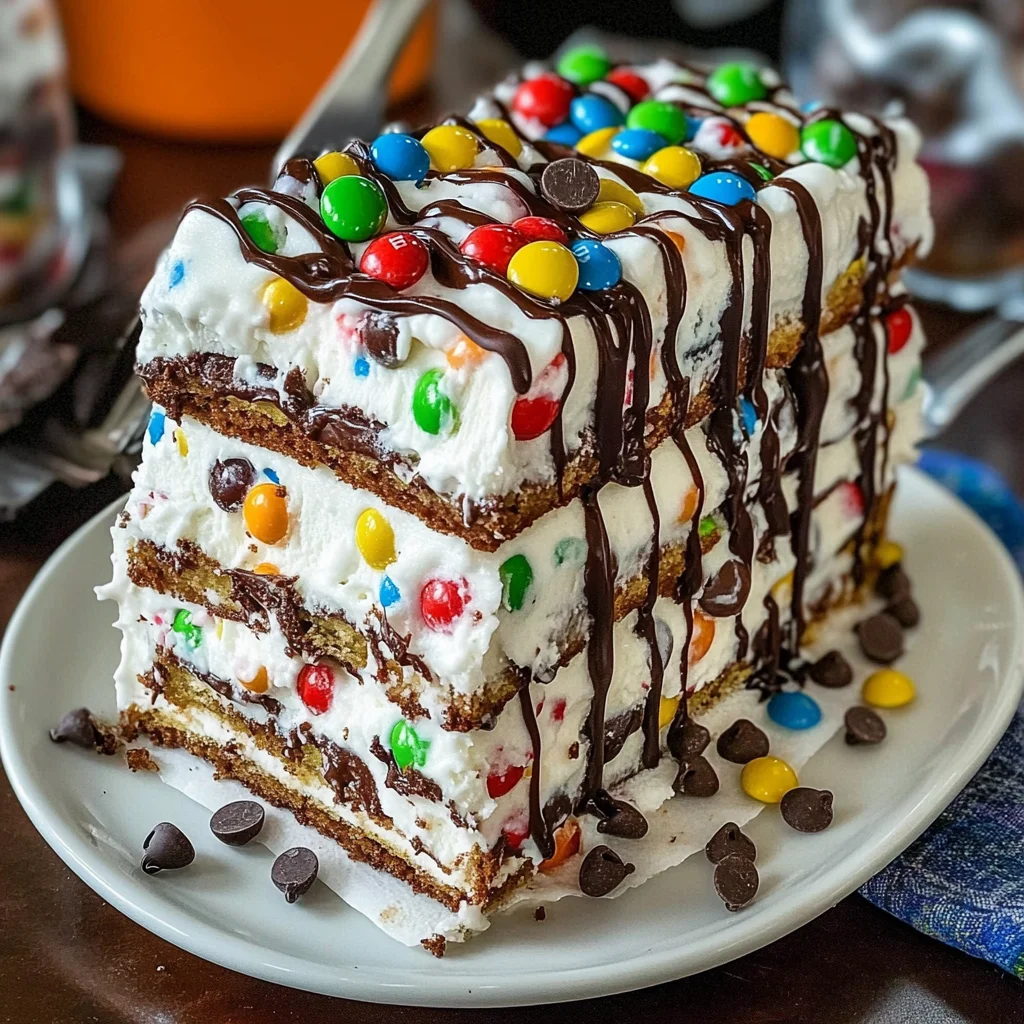
- 12 ice cream sandwiches (unwrapped)
- 16 ounces whipped topping (thawed)
- 1/2 cup miniature chocolate chips
- 3/4 cup mini M&M’s
- 1/3 cup fudge sauce
How to Make Ice Cream Sandwich Cake
Step 1: Layer the Ice Cream Sandwiches
- Place 4 ice cream sandwiches in a row on a serving plate.
- Use a piping bag fitted with a large star tip to pipe dollops of whipped topping over the ice cream sandwiches.
- Sprinkle chocolate chips and M&M’s over the layer of whipped topping.
- Freeze until firm.
Step 2: Repeat the Layers
- Repeat the process with the remaining ice cream sandwiches, whipped topping, and candies.
- Ensure you have 3 layers of ice cream sandwiches along with 3 layers of whipped topping and candies.
- Freeze each layer until firm before proceeding with the next layer.
Step 3: Final Freeze and Serve
- Freeze the whole cake until firm, at least 1 hour.
- Drizzle fudge sauce over the top of the cake before cutting into slices.
- Serve immediately and enjoy!
This Ice Cream Sandwich Cake is sure to become a favorite dessert for any occasion!
How to Serve Ice Cream Sandwich Cake
Ice cream sandwich cake is a delightful treat that can be served in various ways. Whether you’re hosting a party or enjoying a casual family dinner, these serving suggestions will elevate your dessert experience.
Individual Slices
- Cut into slices: Serve each guest their own slice for easy enjoyment.
- Add a drizzle: Top each slice with extra fudge sauce or chocolate syrup for an indulgent touch.
Dessert Bar
- Create a DIY dessert station: Set up a bar with toppings like sprinkles, fruit, and nuts for guests to customize their slices.
- Offer different sauces: Provide options such as caramel or strawberry sauce alongside the fudge for variety.
Cup Portions
- Scoop into cups: For a fun twist, scoop the cake into dessert cups for individual servings.
- Layered treats: Alternate layers of cake and whipped topping in clear cups for an appealing presentation.
Kids’ Parties
- Fun shapes: Use cookie cutters to cut out shapes from the cake for a playful presentation at kids’ parties.
- Personalize with names: Write guests’ names on their plate with chocolate sauce for an extra special touch.
How to Perfect Ice Cream Sandwich Cake
To make your ice cream sandwich cake truly impressive, follow these tips. They will help you achieve the best texture and flavor.
- Thaw whipped topping properly: Ensure that your whipped topping is fully thawed before using it. This helps create smooth layers between the ice cream sandwiches.
- Freeze between layers: Always freeze each layer until firm before adding the next. This keeps the structure intact and makes slicing easier.
- Use fresh toppings: Fresh candies and toppings add crunch and flavor. Check expiration dates to ensure quality.
- Customize flavors: Experiment with different flavors of ice cream sandwiches to match your preferences or theme of the event.
- Let it sit before serving: Allow the cake to sit at room temperature for about 5 minutes before cutting. This makes slicing easier and enhances the flavors.
Best Side Dishes for Ice Cream Sandwich Cake
Pairing side dishes with your ice cream sandwich cake can enhance your dessert spread. Here are some tasty options to consider.
- Fresh Fruit Salad: A light mix of seasonal fruits adds freshness and balances the richness of the cake.
- Chocolate Dipped Strawberries: These sweet treats offer a delicious contrast to the ice cream sandwich cake’s textures.
- Mini Cheesecakes: Individual mini cheesecakes provide another creamy dessert option that complements the main dish well.
- Cookies: A variety of cookies, such as chocolate chip or oatmeal raisin, can be fun accompaniments for guests to nibble on.
- Popsicles: Homemade fruit popsicles are refreshing and provide a cool contrast alongside the rich ice cream sandwich cake.
- Nutty Trail Mix: A crunchy trail mix can add texture and provides a savory counterpoint to the sweetness of dessert.
Common Mistakes to Avoid
Creating an ice cream sandwich cake can be fun and easy, but there are common pitfalls that can affect your final dessert.
- Skipping the Thawing Step: Not allowing your whipped topping to thaw properly can result in a lumpy texture. Always ensure it’s fully thawed for a smooth layer.
- Overloading on Toppings: Adding too many toppings may cause the layers to slide apart. Stick to recommended amounts for a balanced flavor and structure.
- Insufficient Freezing Time: Rushing through the freezing steps can lead to a melting mess. Freeze each layer thoroughly before adding the next.
- Using Stale Ice Cream Sandwiches: Old or freezer-burnt sandwiches won’t hold their shape well. Always use fresh ice cream sandwiches for best results.
- Ignoring Layer Uniformity: Uneven layers can make slicing difficult and affect visual appeal. Aim for consistent layers of ice cream sandwiches and toppings.
Storage & Reheating Instructions
Refrigerator Storage
- Store leftovers in an airtight container.
- The cake will remain fresh for up to 3 days in the refrigerator.
Freezing Ice Cream Sandwich Cake
- If you need to store it longer, wrap the cake tightly in plastic wrap and aluminum foil.
- It can be frozen for up to 2 months without losing quality.
Reheating Ice Cream Sandwich Cake
- Oven: This dessert is best served cold; reheating is not recommended, but if needed, use a low temperature briefly.
- Microwave: You can soften individual slices in the microwave for about 10 seconds if too hard, but don’t overheat.
- Stovetop: Not applicable as this dessert should ideally be served chilled.
Frequently Asked Questions
What is an Ice Cream Sandwich Cake?
An ice cream sandwich cake is a layered dessert made with ice cream sandwiches, whipped topping, and various toppings like candies and sauces. It’s a delightful treat perfect for any occasion.
Can I customize my Ice Cream Sandwich Cake?
Absolutely! You can add different toppings such as fruits or nuts, or even change the type of whipped topping used for variety.
How long does it take to make an Ice Cream Sandwich Cake?
The preparation time is about 20 minutes with an additional freeze time of at least one hour until firm. Total time is approximately 1 hour and 20 minutes including freezing.
How do I serve Ice Cream Sandwich Cake?
Slice the cake into squares or rectangles after it’s fully frozen. Drizzle fudge sauce on top just before serving for added flavor!
Is this recipe suitable for parties?
Yes! This ice cream sandwich cake is visually impressive and easy to serve, making it ideal for birthday parties, summer gatherings, and school events.
Final Thoughts
This ice cream sandwich cake combines simplicity with creativity, making it an excellent choice for any celebration. With endless customization options, you can adjust flavors and toppings according to your preferences. Give this delightful dessert a try!
Ice Cream Sandwich Cake

Indulge in the delightful layers of this Ice Cream Sandwich Cake, a fun and easy dessert that’s perfect for summer gatherings, birthday celebrations, or a sweet treat on a hot day. This no-bake cake features creamy ice cream sandwiches stacked with fluffy whipped topping and vibrant candy. With each slice, you’ll experience a harmonious blend of textures and flavors that will surely impress guests of all ages. Customize it with your favorite toppings to make it uniquely yours! Plus, there’s no need to turn on the oven, keeping your kitchen cool while you whip up this delicious dessert.
- Prep Time: 20 minutes
- Cook Time: None
- Total Time: 0 hours
- Yield: Serves approximately 12 slices 1x
- Category: Dessert
- Method: No-Bake
- Cuisine: American
Ingredients
- 12 ice cream sandwiches (unwrapped)
- 16 ounces whipped topping (thawed)
- 1/2 cup miniature chocolate chips
- 3/4 cup mini M&M's
- 1/3 cup fudge sauce
Instructions
- Layer 4 ice cream sandwiches on a serving plate.
- Pipe whipped topping over the sandwiches and sprinkle with chocolate chips and M&M's.
- Freeze until firm, then repeat with remaining ingredients for a total of 3 layers.
- Freeze the entire cake for at least 1 hour.
- Drizzle fudge sauce over the top before slicing and serving.
Nutrition
- Serving Size: 1 slice (approximately 100g)
- Calories: 230
- Sugar: 18g
- Sodium: 90mg
- Fat: 9g
- Saturated Fat: 5g
- Unsaturated Fat: 3g
- Trans Fat: 0g
- Carbohydrates: 34g
- Fiber: 1g
- Protein: 3g
- Cholesterol: 0mg