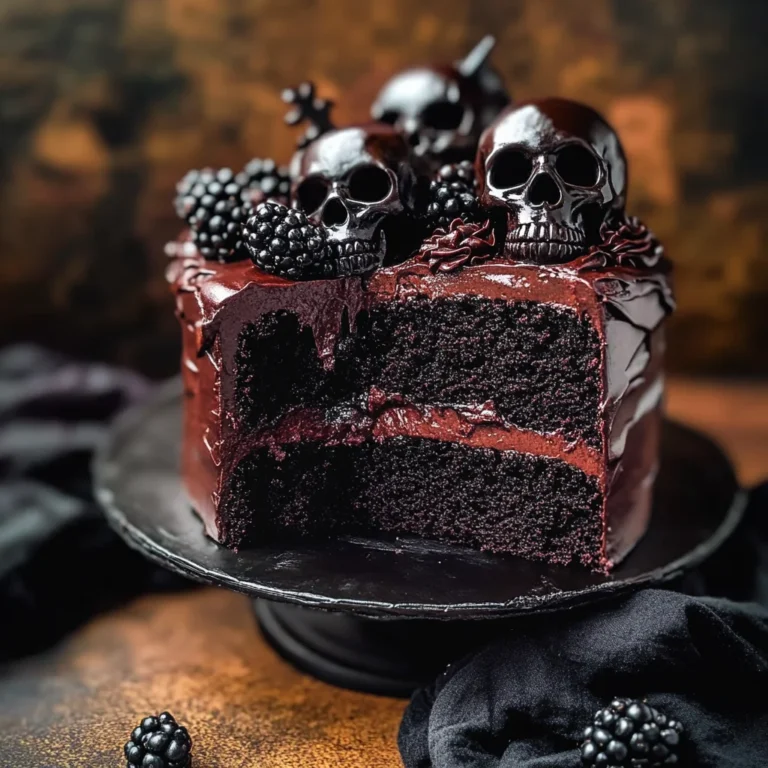
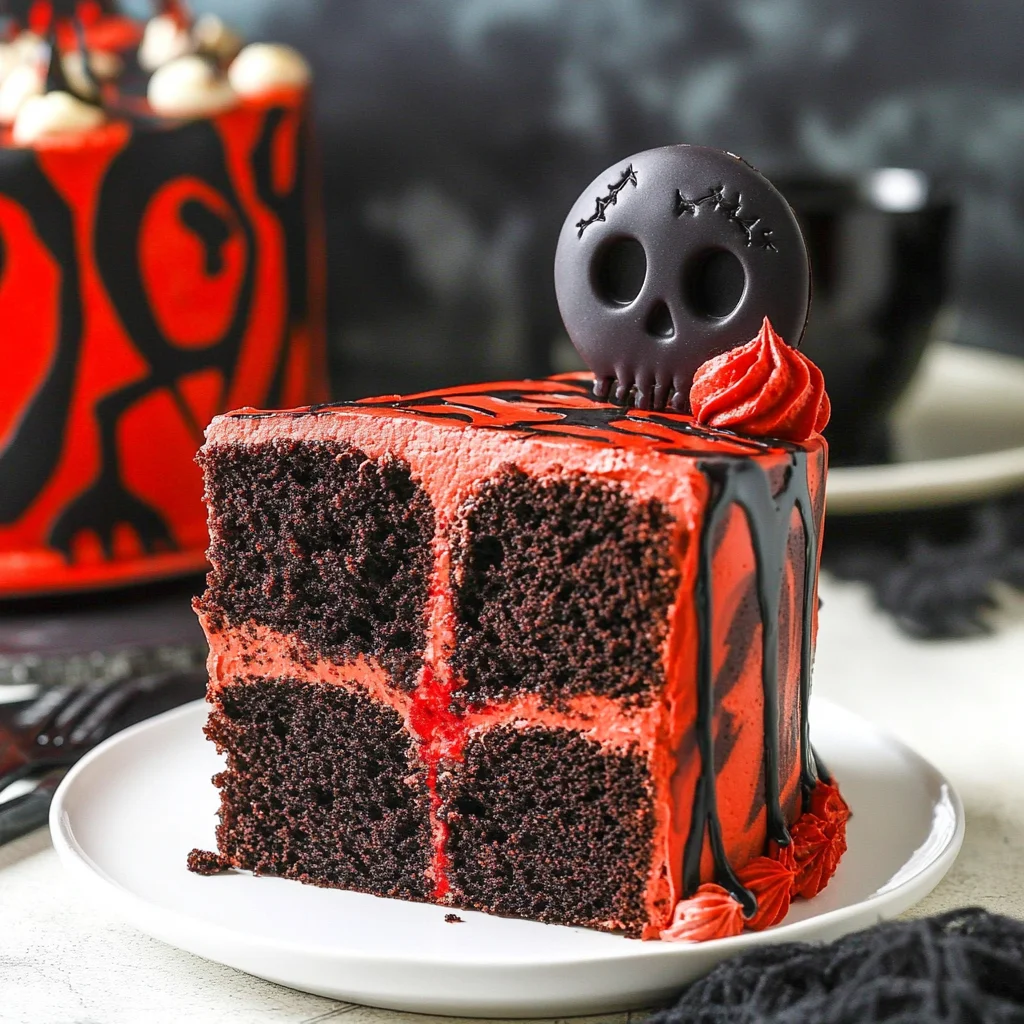
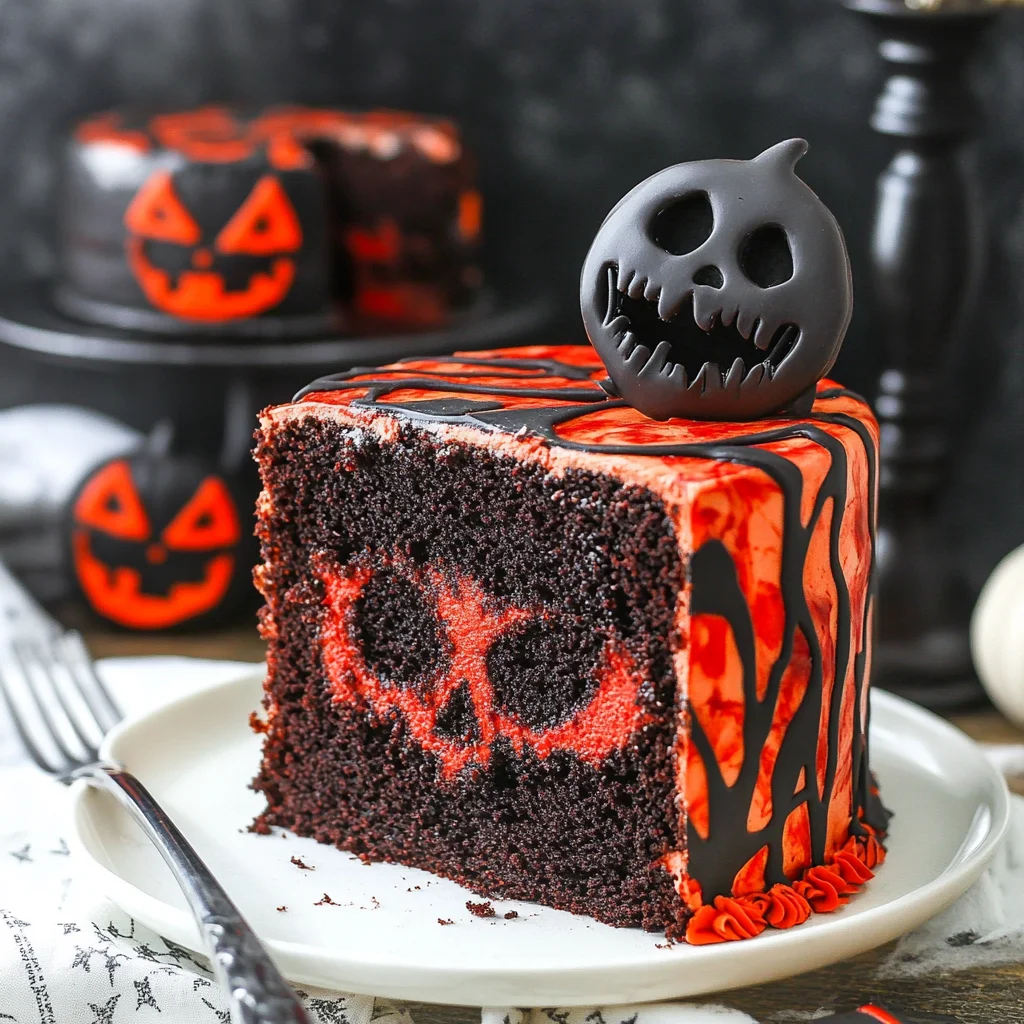
Spooky Halloween Marble Cake
This Spooky Halloween Marble Cake is an eye-catching dessert perfect for your Halloween celebrations! With its striking red and black marble design, this cake not only tastes delicious but also serves as a fantastic centerpiece for any spooky gathering. The unique decoration of drippy red blood and fun eyeball sprinkles adds a playful touch that kids and adults alike will enjoy.
Why You’ll Love This Recipe
- Eye-Catching Design: The dramatic colors and spooky decorations create a show-stopping cake that everyone will be talking about.
- Delicious Flavor: A combination of chocolate and vanilla flavors ensures that every bite is rich and satisfying.
- Perfect for Any Occasion: Whether it’s a Halloween party or a themed event, this marble cake fits right in.
- Easy to Customize: You can adjust the decorations or even the colors to suit your personal style or party theme.
- Fun for All Ages: Kids will love helping with the decorating, making it a fun family activity.
Tools and Preparation
To create your Spooky Halloween Marble Cake, you’ll need some essential tools. Gathering these items in advance will make your baking process smoother and more enjoyable.
Essential Tools and Equipment
- Mixing bowls
- Electric mixer
- Measuring cups and spoons
- Rubber spatula
- Cake pans (9-inch)
- Cooling rack
Importance of Each Tool
- Electric mixer: Ensures that your batter is mixed thoroughly, saving time and effort compared to hand mixing.
- Cake pans: A good quality pan helps in even baking, ensuring that your cake rises beautifully without sticking.
- Cooling rack: Allows air circulation around the cake, preventing sogginess as it cools down.
Ingredients
Here are the ingredients you’ll need to create your Spooky Halloween Marble Cake:
For the Cake
- 2 1/4 cups (293g) all purpose flour
- 2 1/2 tsp baking powder
- 1/4 tsp baking soda
- 1/2 tsp salt
- 1/2 cup (112g) unsalted butter, room temperature
- 1/2 cup vegetable oil
- 1 1/2 cups (310g) sugar
- 1 tbsp vanilla extract
- 4 large eggs
- 1 cup (240ml) buttermilk
- 5 oz bittersweet chocolate (60% cacao), chopped
For the Frosting and Decoration
- Black gel icing color
- Red gel icing color
- 2 1/4 cups (504g) unsalted butter
- 8 cups (920g) powdered sugar
- 1 cup (114g) natural unsweetened cocoa powder
- 2 tsp vanilla extract
- 5-7 tbsp (75-105ml) water/cream
- 1/4 tsp salt
- Black gel icing color
- 4 oz red Wilton candy melts
- 2 tbsp heavy whipping cream
- Sprinkles (see notes)
How to Make Spooky Halloween Marble Cake
Step 1: Preheat the Oven
Preheat your oven to 350°F (175°C). Grease two 9-inch round cake pans and line them with parchment paper for easy removal.
Step 2: Prepare the Batter
In a large mixing bowl:
1. Combine flour, baking powder, baking soda, and salt. Set aside.
2. In another bowl, cream together the unsalted butter, vegetable oil, and sugar until light and fluffy.
3. Add eggs one at a time, mixing well after each addition. Stir in vanilla extract and buttermilk.
Step 3: Incorporate Dry Ingredients
Gradually add the flour mixture to the wet ingredients. Mix until just combined.
Step 4: Create the Marble Effect
Divide the batter into two bowls. Melt the bittersweet chocolate in a microwave or double boiler. Stir half of the batter into the melted chocolate for the dark part of your marble cake.
Step 5: Layer in Pans
Scoop alternating spoonfuls of each batter into prepared pans. Use a knife or skewer to gently swirl them together for a marbled effect.
Step 6: Bake
Bake for about 20 minutes or until a toothpick inserted in the center comes out clean. Let cool in pans for 10 minutes before transferring to wire racks to cool completely.
Step 7: Frosting Preparation
While cakes cool, prepare frosting by creaming together unsalted butter with powdered sugar, cocoa powder, salt, vanilla extract, and water or cream until fluffy.
Step 8: Assemble & Decorate
Once cooled, spread frosting between layers and on top of the cake. Use black and red gel icing for decoration along with sprinkles to create a spooky look!
How to Serve Spooky Halloween Marble Cake
This Spooky Halloween Marble Cake makes a stunning centerpiece for your Halloween gathering. Here are some fun ways to serve it and enhance the spooky vibe.
For Kids
- Ghoulish Plates: Serve slices on themed plates featuring ghosts or monsters to delight young guests.
- Spooky Garnish: Add gummy worms or candy eyes on top of each slice for an extra fright!
At a Halloween Party
- Buffet Style: Slice the cake into small squares and display them on a tiered cake stand with eerie decorations.
- Creepy Cupcakes: Use leftover batter to create mini cupcakes, decorating them similarly to the main cake for variety.
For Adults
- Coffee Pairing: Serve slices with a side of rich coffee or pumpkin spice latte to complement the flavors.
- Wine Selection: Offer a glass of red wine, which pairs nicely with the dark chocolate and adds to the spooky theme.
How to Perfect Spooky Halloween Marble Cake
Perfecting your Spooky Halloween Marble Cake is all about technique and attention to detail. Here are some tips to ensure your cake turns out perfectly every time.
- Layering: When preparing your batter, alternate layers of red and black smoothly to create a striking marble effect.
- Temperature Matters: Ensure all ingredients are at room temperature before mixing for better incorporation and texture.
- Chill Your Tools: Chill your mixing bowls and beaters before making frosting for a smoother consistency.
- Test Doneness: Insert a toothpick in the center; it should come out clean when the cake is done baking.
Best Side Dishes for Spooky Halloween Marble Cake
Pairing side dishes with your Spooky Halloween Marble Cake can elevate your dessert table. Here are some great options that complement its flavors.
- Witch’s Brew Punch: A refreshing fruit punch that adds color and sweetness, perfect for balancing the richness of the cake.
- Savory Spider Dip: A creamy spinach dip served in a hollowed-out pumpkin, adding both flavor and festivity.
- Ghostly Cheese Platter: An assortment of cheeses shaped like ghosts or mummies, offering savory contrasts to the sweet cake.
- Monster Veggie Tray: Colorful veggies arranged in fun shapes with a spooky dip in the center, keeping things healthy yet thematic.
- Bloody Berry Compote: A tart berry sauce that can be drizzled over each slice of cake for an extra zing!
- Creepy Charcuterie Board: A mix of cured meats, nuts, and fruits that provide a variety of textures alongside your dessert.
Common Mistakes to Avoid
When making a Spooky Halloween Marble Cake, it’s easy to encounter some common pitfalls. Here are a few mistakes to watch out for.
- Using cold ingredients – Make sure your butter and eggs are at room temperature. Cold ingredients can lead to a dense cake.
- Overmixing the batter – Mix just until combined. Overmixing can result in a tough texture instead of a light and fluffy cake.
- Not checking oven temperature – Always preheat your oven and use an oven thermometer if necessary. An incorrect temperature can ruin your cake’s rise and texture.
- Skipping the cooling time – Allow the cake to cool completely before frosting. This prevents the icing from melting and ensures a beautiful finish.
- Neglecting decoration – Take the time to decorate your cake with drippy red blood and sprinkles. A well-decorated cake enhances its spooky appeal.
Storage & Reheating Instructions
Refrigerator Storage
- Keep the Spooky Halloween Marble Cake in an airtight container.
- It will last up to 5 days in the refrigerator.
Freezing Spooky Halloween Marble Cake
- Wrap slices tightly in plastic wrap and then place them in a freezer-safe bag.
- The cake can be frozen for up to 3 months.
Reheating Spooky Halloween Marble Cake
- Oven – Preheat your oven to 350°F (175°C) and heat the cake for about 10 minutes.
- Microwave – Heat individual slices on medium power for about 15-20 seconds.
- Stovetop – Place slices in a covered pan on low heat for approximately 5 minutes.
Frequently Asked Questions
Here are some frequently asked questions about making a Spooky Halloween Marble Cake.
How do I achieve the perfect marble effect?
To create an eye-catching marble effect, use a knife or skewer to swirl together black and red batters gently without over-mixing.
Can I make this cake ahead of time?
Yes! You can bake the Spooky Halloween Marble Cake up to two days in advance. Just store it properly and frost it closer to serving time.
What can I use instead of buttermilk?
If you don’t have buttermilk, you can make your own by mixing one cup of milk with one tablespoon of vinegar or lemon juice. Let it sit for about 5 minutes before using it.
Can I customize my decorations?
Absolutely! Feel free to get creative with decorations. You could add different colored sprinkles or even themed edible toppers for added fun!
Final Thoughts
The Spooky Halloween Marble Cake is not only visually striking but also deliciously moist and flavorful. It makes for a perfect centerpiece at your Halloween gatherings. Don’t hesitate to customize it with your favorite decorations or flavors, turning this classic treat into something uniquely yours!
Spooky Halloween Marble Cake

Indulge in the festive spirit with our Spooky Halloween Marble Cake, a captivating dessert that combines rich chocolate and vanilla flavors with a striking red and black marble design. Perfect for Halloween gatherings, this cake dazzles with its eerie decorations of drippy red “blood” and playful eyeball sprinkles, making it a delightful centerpiece for both kids and adults. Easy to make and customize, this recipe offers an exciting family activity that guarantees smiles all around. Whether you’re hosting a spooky party or simply celebrating the season, this haunted treat is sure to impress!
- Prep Time: 30 minutes
- Cook Time: 20 minutes
- Total Time: 50 minutes
- Yield: Approximately 12 servings 1x
- Category: Dessert
- Method: Baking
- Cuisine: American
Ingredients
- 2 1/4 cups (293g) all purpose flour
- 2 1/2 tsp baking powder
- 1/4 tsp baking soda
- 1/2 tsp salt
- 1/2 cup (112g) unsalted butter, room temperature
- 1/2 cup vegetable oil
- 1 1/2 cups (310g) sugar
- 1 tbsp vanilla extract
- 4 large eggs
- 1 cup (240ml) buttermilk
- 5 oz bittersweet chocolate (60% cacao), chopped
- Black gel icing color
- Red gel icing color
- 2 1/4 cups (504g) unsalted butter
- 8 cups (920g) powdered sugar
- 1 cup (114g) natural unsweetened cocoa powder
- 2 tsp vanilla extract
- 5–7 tbsp (75-105ml) water/cream
- 1/4 tsp salt
- 4 oz red Wilton candy melts
- 2 tbsp heavy whipping cream
- Sprinkles (see notes)
Instructions
- Preheat your oven to 350°F (175°C). Grease two 9-inch round cake pans and line them with parchment paper for easy removal.
- In a large mixing bowl: combine flour, baking powder, baking soda, and salt. Set aside. In another bowl, cream together the unsalted butter, vegetable oil, and sugar until light and fluffy. Add eggs one at a time, mixing well after each addition. Stir in vanilla extract and buttermilk.
- Gradually add the flour mixture to the wet ingredients. Mix until just combined.
- Divide the batter into two bowls. Melt the bittersweet chocolate in a microwave or double boiler. Stir half of the batter into the melted chocolate for the dark part of your marble cake.
- Scoop alternating spoonfuls of each batter into prepared pans. Use a knife or skewer to gently swirl them together for a marbled effect.
- Bake for about 20 minutes or until a toothpick inserted in the center comes out clean. Let cool in pans for 10 minutes before transferring to wire racks to cool completely.
- While cakes cool, prepare frosting by creaming together unsalted butter with powdered sugar, cocoa powder, salt, vanilla extract, and water or cream until fluffy.
- Once cooled, spread frosting between layers and on top of the cake. Use black and red gel icing for decoration along with sprinkles to create a spooky look!
Nutrition
- Serving Size: 1 slice (80g)
- Calories: 310
- Sugar: 30g
- Sodium: 150mg
- Fat: 15g
- Saturated Fat: 7g
- Unsaturated Fat: 7g
- Trans Fat: 0g
- Carbohydrates: 40g
- Fiber: 1g
- Protein: 3g
- Cholesterol: 50mg